Skip to content
Free Excel Tutorials
  • Home
  • Excel For Beginners
  • Excel Intermediate
  • Advanced Excel For Experts

Data Analysis

  • Get column name from index in Excel Table
  • Understanding Anova in Excel
  • How to Create Column Chart in Excel
  • How to Create Thermometer Chart in Excel
  • Filter Data Based on Date in Excel

References

  • Lookup entire row in Excel
  • Merge tables with VLOOKUP in Excel
  • Create hyperlink with VLOOKUP in Excel
  • VLOOKUP function: Description, Usage, Syntax, Examples and Explanation
  • How to use Excel MMULT Function

Data Validations

  • Excel Data validation specific characters only
  • Excel Data validation date in specific year
  • Excel Data validation don’t exceed total
  • Excel Data validation whole percentage only
  • Excel Data validation must begin with

TREND function: Description, Usage, Syntax, Examples and Explanation

by

What is TREND function in Excel?

TREND function in Excel is a Statistical Function that computes the linear trend line based on the given linear set of data. TREND in Excel calculates the predictive values of Y for given array values of X and uses the least square method based on the given two data series.

Explanation of TREND function

TREND returns values along a linear trend. Fits a straight line (using the method of least squares) to the arrays known_y’s and known_x’s. Returns the y-values along that line for the array of new_x’s that you specify.

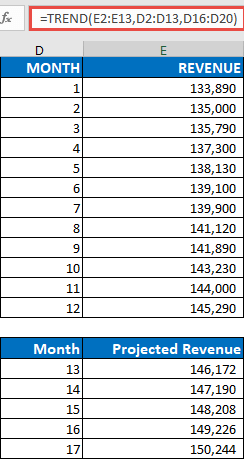
Note: If you have a current version of Office 365, then you can input the formula in the top-left-cell of the output range (cell E16 in this example), then press ENTER to confirm the formula as a dynamic array formula. Otherwise, the formula must be entered as a legacy array formula by first selecting the output range (E16:E20), input the formula in the top-left-cell of the output range (E16), then press CTRL+SHIFT+ENTER to confirm it. Excel inserts curly brackets at the beginning and end of the formula for you.
Click link to see practical illustration of TREND functionTREND function.

Post navigation

Previous Post:

How to generate random date between two dates in Excel

Leave a Reply Cancel reply

Your email address will not be published. Required fields are marked *

Learn Basic Excel

Ribbon
Workbook
Worksheets
Format Cells
Find & Select
Sort & Filter
Templates
Print
Share
Protect
Keyboard Shortcuts

Categories

  • Charts
  • Data Analysis
  • Data Validation
  • Excel Functions
    • Cube Functions
    • Database Functions
    • Date and Time Functions
    • Engineering Functions
    • Financial Functions
    • Information Functions
    • Logical Functions
    • Lookup and Reference Functions
    • Math and Trig Functions
    • Statistical Functions
    • Text Functions
    • Web Functions
  • Excel VBA
  • Excel Video Tutorials
  • Formatting
  • Grouping
  • Others

Logical Functions

  • Nested IF function example in Excel
  • How to use Excel FALSE Function
  • How to use Excel XOR Function
  • How to use IFS function in Excel
  • IF with boolean logic in Excel

Date Time

  • TIMEVALUE function: Description, Usage, Syntax, Examples and Explanation
  • Create date range from two dates in Excel
  • Get work hours between dates in Excel
  • Series of dates by day
  • NOW function: Description, Usage, Syntax, Examples and Explanation

Grouping

  • Group numbers with VLOOKUP in Excel
  • Group times into unequal buckets in Excel
  • How to randomly assign data to groups in Excel
  • How to randomly assign people to groups in Excel
  • Group numbers at uneven intervals in Excel

General

  • List sheet names with formula in Excel
  • Delete Blank Rows at Once in Excel
  • Excel Ribbon Quick Overview For Beginners
  • How to Insert Cells, Row and Rows in Excel
  • How to calculate percentage discount in Excel
© 2026 xlsoffice . All Right Reserved. | Teal Smiles | Abbreviations And Their Meaning