
Skip to content
Free Excel Tutorials
  • Home
  • Excel For Beginners
  • Excel Intermediate
  • Advanced Excel For Experts

Data Analysis

  • How to do a t-Test in Excel?
  • Data Series in Excel
  • Filter Data Based on Date in Excel
  • Create Scatter Chart in Excel
  • How To Create Pareto Chart in Excel

References

  • How to use Excel MATCH Function
  • How to use Excel COLUMN Function
  • How to use Excel LOOKUP Function
  • How to get address of named range in Excel
  • Convert text string to valid reference in Excel using Indirect function

Data Validations

  • Excel Data validation no punctuation
  • Excel Data validation date in next 30 days
  • Excel Data validation allow uppercase only
  • Excel Data validation date in specific year
  • Excel Data validation specific characters only

How to calculate months between dates in Excel

by

To calculate months between two dates as a whole number, you can use the DATEDIF function.

Formula

=DATEDIF(start_date,end_date,"m")
Explanation

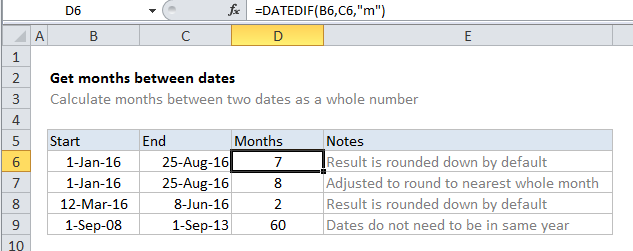
In the example shown, the formula in D6 is:

=DATEDIF(B6,C6,"m")

Note that the DATEDIF automatically rounds down. To round up to the nearest month, see below.

The mystery of DATEDIF

The DATEDIF function is a “compatibility” function that comes from Lotus 1-2-3. For reasons unknown, DATEDIF is only documented in Excel 2000, and will not appear as a suggested function in the formula bar. However, you can use DATEDIF in all Excel versions since that time, you just need to enter the function manually. Excel will not help you with function arguments.

How this formula works

DATEDIF takes 3 arguments: start date, end_date, and unit. In this case, we want months, so we supply “m” for unit.

DATEDIF automatically calculates and returns a number for months, rounded down.

Nearest whole month

If you want to calculate months to the nearest whole month, you can make a simple adjustment to the formula:

=DATEDIF(start_date,end_date+15,"m")

This ensures that end dates occurring in the 2nd half of the month are treated like dates in the following month, effectively rounding up the final result.

Post navigation

Previous Post:

DECIMAL function: Description, Usage, Syntax, Examples and Explanation

Next Post:

AVERAGE function: Description, Usage, Syntax, Examples and Explanation

Leave a Reply Cancel reply

Your email address will not be published. Required fields are marked *

Learn Basic Excel

Ribbon
Workbook
Worksheets
Format Cells
Find & Select
Sort & Filter
Templates
Print
Share
Protect
Keyboard Shortcuts

Categories

  • Charts
  • Data Analysis
  • Data Validation
  • Excel Functions
    • Cube Functions
    • Database Functions
    • Date and Time Functions
    • Engineering Functions
    • Financial Functions
    • Information Functions
    • Logical Functions
    • Lookup and Reference Functions
    • Math and Trig Functions
    • Statistical Functions
    • Text Functions
    • Web Functions
  • Excel VBA
  • Excel Video Tutorials
  • Formatting
  • Grouping
  • Others

Logical Functions

  • Nested IF function example in Excel
  • SWITCH function example in Excel
  • IF with boolean logic in Excel
  • SWITCH function: Description, Usage, Syntax, Examples and Explanation
  • OR function Examples in Excel

Date Time

  • EOMONTH function: Description, Usage, Syntax, Examples and Explanation
  • Extract time from a date and time in Excel
  • Add years to date in Excel
  • YEAR function: Description, Usage, Syntax, Examples and Explanation
  • Dynamic date list in Excel

Grouping

  • Calculate conditional mode with criteria in Excel
  • Map text to numbers in Excel
  • How to randomly assign people to groups in Excel
  • How to randomly assign data to groups in Excel
  • Group numbers with VLOOKUP in Excel

General

  • Freeze and Unfreeze Panes in Excel
  • Excel Default Templates
  • Subtotal invoices by age in Excel
  • How to make excel worksheets print on one page?
  • Excel Ribbon Quick Overview For Beginners
© 2026 xlsoffice . All Right Reserved. | Teal Smiles | Abbreviations And Their Meaning