Skip to content
Free Excel Tutorials
  • Home
  • Excel For Beginners
  • Excel Intermediate
  • Advanced Excel For Experts

Data Analysis

  • Add Outline to Data in Excel
  • How to do a t-Test in Excel?
  • How to count table rows in Excel
  • How to Create One and Two Variable Data Tables in Excel
  • How to create a Histogram in Excel

References

  • Complete List of Excel Lookup and Reference Functions, References and Examples
  • How to reference named range different sheet in Excel
  • How to use Excel MMULT Function
  • How to get last row in numeric data in Excel
  • How to use Excel LOOKUP Function

Data Validations

  • Excel Data validation date in specific year
  • How To Create Drop-down List in Excel
  • Excel Data validation whole percentage only
  • Excel Data validation date in next 30 days
  • Excel Data validation specific characters only

How to use Excel ROW Function

by

This Excel tutorial explains how to use the ROW function with syntax and examples.

Excel ROW Function Description

Microsoft Excel ROW function returns the row number of a cell reference.

The ROW function is a built-in function in Excel that is categorized as a Lookup/Reference Function. The ROW function can be entered as part of a formula in a cell of a worksheet.

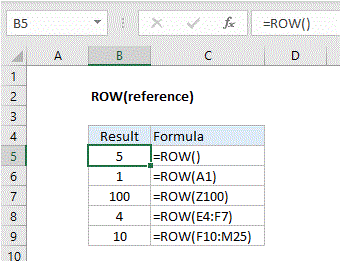
Explanation: The Excel ROW function returns the row number for a reference. For example, ROW(C5) returns 5, since C5 is the fifth row in the spreadsheet. When no reference is provided, ROW returns the row number of the cell which contains the formula.

ROW function is used to get the row number for a cell reference or a range. For example:

=ROW(A3) // returns 3
=ROW(D5) // returns 5
=ROW(F10:J15) // returns 10

Syntax

The syntax for the ROW function in Microsoft Excel is:

ROW( [reference] )

Arguments

reference
Optional. It is a reference to a cell or range of cells.

Returns

The ROW function returns a numeric value.

Note: If the reference parameter is omitted, it assumes that the reference is the cell address in which the ROW function has been entered in.

Post navigation

Previous Post:

VLOOKUP without #N/A error in Excel

Next Post:

Manipulating text strings using Left, Mid, Right, Len, Substitute in Excel

Leave a Reply Cancel reply

Your email address will not be published. Required fields are marked *

Learn Basic Excel

Ribbon
Workbook
Worksheets
Format Cells
Find & Select
Sort & Filter
Templates
Print
Share
Protect
Keyboard Shortcuts

Categories

  • Charts
  • Data Analysis
  • Data Validation
  • Excel Functions
    • Cube Functions
    • Database Functions
    • Date and Time Functions
    • Engineering Functions
    • Financial Functions
    • Information Functions
    • Logical Functions
    • Lookup and Reference Functions
    • Math and Trig Functions
    • Statistical Functions
    • Text Functions
    • Web Functions
  • Excel VBA
  • Excel Video Tutorials
  • Formatting
  • Grouping
  • Others

Logical Functions

  • How to use Excel FALSE Function
  • Extract multiple matches into separate rows in Excel
  • How to use Excel NOT Function
  • How to use Excel XOR Function
  • How to return blank in place of #DIV/0! error in Excel

Date Time

  • Basic timesheet formula with breaks in Excel
  • Get work hours between dates in Excel
  • MINUTE function: Description, Usage, Syntax, Examples and Explanation
  • Calculate days remaining in Excel
  • Get days between dates in Excel

Grouping

  • Categorize text with keywords in Excel
  • Group times into unequal buckets in Excel
  • Map text to numbers in Excel
  • Group numbers with VLOOKUP in Excel
  • How to randomly assign people to groups in Excel

General

  • Split Cell Content Using Text to Columns in Excel
  • How to create dynamic worksheet reference in Excel
  • Basic numeric sort formula in Excel
  • How to set or clear a print area in Excel Worksheet
  • Find, Select, Replace and Go To Special in Excel
© 2026 xlsoffice . All Right Reserved. | Teal Smiles | Abbreviations And Their Meaning